Awarded Top 40 Physical Education Blog

Physical Education Blogs Physical Education Blogs Physical Education Blogs Physical Education Blogs

Friday, December 11, 2020

Burpees, Air Squats, Sit-Ups (Dec.10-11) and Return of the Wall Sits (Dec.7-8)

 For those that need a refresher or another copy for themselves, below is the workout completed for the week of December 7th - December 11th.

Don't forget to record your workout and turn it into google classroom by the end of the class period.

Burpees, Air Squats, Sit-Ups (Dec.10-11)
Slide 1 - Agenda and Workout Video
Slide 2 - Detailed instructions on how to perform this "for time" WOD.

Return of the Wall Sits (Dec.7-8)
Slide 1 - Title Page
Slide 2 - .Workout Video (Click on BLOCKBUSTER)
Slide 3 - Agenda 

As always, email me if you have any questions / concerns / suggestions.


Wednesday, December 9, 2020

Resilience Lesson Worksheets (Habit of Success)

 Resilience Lesson Worksheets (Habit of Success)

"FOR HOMEROOM  MENTORING ONLY"

In order to make the necessary edits, don't forget to first make a copy of the google slides presentation for yourself.  


As always, email me if you have any questions / concerns / suggestions.


Saturday, December 5, 2020

Tabata Times Workout (Dec.3-4)

For those that need a refresher or another copy for themselves, below is the workout completed for the week of November 30th - December 4th.

Don't forget to record your workout and turn it in to google classroom by the end of the class period.

Tabata Times Workout (Dec.3-4) 

As always, email me if you have any questions/comments/concerns/suggestions.

Tuesday, November 24, 2020

Turkey Trot Workout (Nov.23-24)

 For those that need a refresher or another copy for themselves, below is the workout completed for the week of November 23rd - 27th (Thanksgiving Week).

Don't forget to record your workout and turn it into google classroom by the end of the class period.

Turkey Trot Workout (Nov.23-24)

Slide 1 - Title Page 

Slide 2 - Agenda / Workout Video


As always, email me if you have any questions / concerns / suggestions.


Friday, November 20, 2020

Down The Ladder Workout (Nov.16-17) and Russell Relaxation 6 (Nov.19-20)

 For those that need a refresher or another copy for themselves, below are the workouts completed for the week of November 16th - 20th.

Don't forget to record your workouts and turn them into google classroom by the end of the class period.

Down The Ladder Workout (Nov.16-17)

Slide 1 - Title Page

Slide 2 - Agenda / Workout Video

Russell Relaxation 6 (Nov.19-20)
Slide 1 - Title Page / Agenda

Slide 2 - Workout Video

As always, email me if you have any questions / concerns / suggestions.

Wednesday, November 18, 2020

Self Efficacy Lesson Worksheets (Habit of Success)

 Self Efficacy Lesson Worksheets (Habit of Success)

"FOR HOMEROOM  MENTORING ONLY"

In order to make the necessary edits, don't forget to first make a copy of the google slides presentation for yourself.  


As always, email me if you have any questions / concerns / suggestions.

Friday, November 13, 2020

Sally Squats Challenge (Nov.9-10) and These are the Breaks (Nov.12-13)

 For those that need a refresher or another copy for themselves, below are the workouts completed for the week of November 3rd - 6th.

Don't forget to record your workouts and turn them into google classroom by the end of the class period.

Sally Squats Challenge (Nov.9-10)


These are the Breaks (Nov.12-13)


As always, email me if you have any questions / concerns / suggestions.


Friday, November 6, 2020

Death By Burpees Workout (Nov. 3-4) and Another Stretch Routine (Nov.5-6)

 For those that need a refresher or another copy for themselves, below are the workouts completed for the week of November 3rd - 6th.

Don't forget to record your workouts and turn them into google classroom before the end of the class period.


Death By Burpees Workout (Nov. 3-4)
Slide 1 - Workout Video
Slide 2 - Agenda

Another Stretch Routine (Nov.5-6)
Click on the blockbuster card to play the intro video/daily agenda.

As always, email me if you have any questions, answers, suggestions.


Friday, October 30, 2020

3 Headed Monster Workout (Oct.26-27) and Goosebumps Workout (Oct.29-30)

 Below are the workouts completed for the week of October 26th-30th.

3 Headed Monster Workout (Oct.26-27)

Goosebumps Workout (Oct.29-30)

E-Mail me if you have any questions. 


Friday, October 23, 2020

Abs and 100 Lunge Retest (Oct.19-20) and Crunch Time Workout (Oct.22-23)

Below are the workouts completed for the week of October 19th - 23rd.

Reminder: It is your responsibility to make up any missed work as well as to inform me that you have turned in any late work, so that I may update your grade.


Abs and 100 Lunge Retest 
(Oct.19-20)


Crunch Time Workout
 (Oct.22-23)


E-mail me if you have any questions.


Saturday, October 17, 2020

HAPPY PLACE WORKOUT (Oct.13-14) and Russell Relaxation #5 (Oct.15-16)

 Below are the workouts completed for the week of October 13th - 16th.

Reminder: It is your responsibility to make up any missed work as well as to inform me that you have turned in any late work, so that I may update your grade.


HAPPY PLACE WORKOUT (Oct.13-14)


Russell Relaxation #5 (Oct.15-16)


E-mail me if you have any questions.


Friday, October 9, 2020

The Trifecta Workout (Oct. 5-6) and Raise The Roof Workout (Oct. 8-9)

 Below are the workouts completed for the week of October 5th - 9th.

Reminder: It is your responsibility to make up any missed work as well as to inform me that you have turned in any late work, so that I may update your grade.


The Trifecta Workout 

(Oct. 5-6)


Raise The Roof Workout 
(Oct. 8-9)


Sunday, October 4, 2020

Sept. 28-29 (12 Minute AMRAP) and Oct. 1-2 (Russell Relaxation 4)

 Here are the workouts completed for the week of September 28 - October 2.

Reminder: It is your responsibility to make up any missed work as well as to inform me that you have turned in any late work, so that I may update your grade.


Sept. 28-29 (12 Minute AMRAP)
 

 Oct. 1-2 (Russell Relaxation 4)


E-Mail me if you have any questions.


Tuesday, September 29, 2020

How to Build Up to a Push-Up

How to Build Up to a Push-Up

Make the hard start, easier

In the beginning push-ups are hard. If you try to do a push-up and can’t, go on your knees and do a push-up that way. You work the same muscles but you place less weight on them. So with each one you simply become stronger. 

Strength comes with repetition. The more you do, the stronger you get and the easier it all becomes. 

What they work

Push-ups work your arms (triceps and forearms), your chest, lower back, abs, quads and calves. They work the intercostal muscles covering your ribs and if you do enough of them and breathe in and out explosively as you do them they even work your lungs which means they become an aerobic exercise that also works your cardiovascular and aerobic systems.


Courtesy of Darebee.

Sunday, September 27, 2020

Sept. 21-22 (The 7 Minute Abs Workout) and Sept. 24-25 (Total Body Workout)

 Here are the workouts done for the week of September 21-25.

Reminder: It is your responsibility to make up any missed work as well as to inform me that you have turned in any late work, so that I may update your grade.

Sept. 21-22 

(The 7 Minute Abs Workout)


Sept. 24-25 (Total Body Workout)


Friday, September 18, 2020

Sept. 14-15 (Russell Relaxation) and Sept. 17-18 (Burpee, Sit-Up, Air Squat)

 Here are the workouts done for the week of September 14-18.  

Reminder: It is your responsibility to make up any missed work as well as to inform me that you have turned in any late work, so that I may update your grade.

Sept. 14-15 

(Russell Relaxation)

Sept. 17-18 

(Burpee, Sit-Up, Air Squat)


E-mail me if you have any questions.

Friday, September 11, 2020

Sept. 8-9 (Shoulders and Lunge Challenge Workout) and Sept. 10-11 (Curl-Up Diagnostic)

 Here are the workouts done for the week of September 7-11.  

Reminder: It is your responsibility to make up any missed work as well as to inform me that you have turned in any late work, so that I may update your grade.

Sept. 8-9 (Shoulders and Lunge Challenge Workout)

 
Sept. 10-11 (Curl-Up Diagnostic)


E-mail me if you have any questions.


Thursday, September 3, 2020

What is a Tabata?

 Here is an infographic of what a Tabata is and how it is used in relation to exercise.


Think you are ready to take on this type of workout.  Here is an easy to understand guide to an actual 30 min Tabata Workout.  Have fun...


Week of 8/24-28 (RUSSELL RELAXATION)

Below you will find the workouts from the week of 8/24-28.

Wednesday, September 2, 2020

Your Average Daily Calorie Requirements, Easy Ways to Burn off 100 Calories

Burning Calories doesn't always have to be a heavy undertaking with hours spent at the gym.  A high intensity 10-minute home workout can burn calories at lightning speed.


Some Calorie Math with your Average Daily Calorie Requirements ( this can differ based on the type of lifestyle that you are living).

The Calorie Math Poster helps everyone understand how to balance calories coming in and going out. 

The message is simple, "Maintain an active lifestyle and be aware of the calories that you eat and drink at each meal."

Here are key messages and facts on this beautiful poster that gives all of the stats for movement and health:

  • Whole unprocessed foods that are low in added fats and sugars and higher in fiber fill you up on fewer calories. 
  • Fried foods increase calories by up to three times!
  • Any movement counts, pick a favorite to burn double or more calories moving versus sitting.
  • It is easy to lose a pound a week by eating 250 fewer calories and moving more to burn 250 calories per day with exercise.
  • Calories per day for various activity levels are shown.
  • How to balance calories per day by dividing them between meals and snacks
  • How many calories are in a pound of body fat?


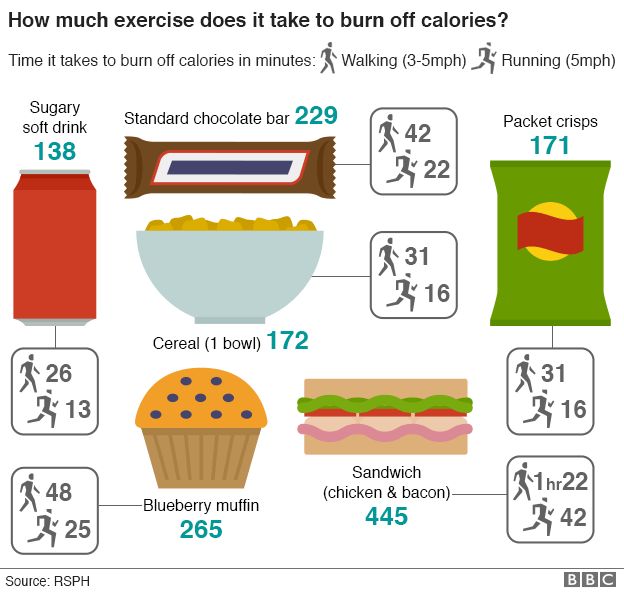
Below are 2 posters to show how many calories are in many foods and how long it takes to walk them off.


Thursday, August 13, 2020

Zoom/Google/Online Class Rules, Etiquette, and Expectations

WELCOME NEW 7th Graders

I thought I'd take this time out to let you know about some things that will be expected of you this school year certainly in my class and possibly in your other classes too.  I also included some tips for successful video calls that might be helpful to you in the near future. 

You will find many different rules and expectations about zoom and google meets online. Below are some that I have found to ring true for what I will expect in our class daily, as well as our class etiquette and expectations at the bottom of the post.


Tuesday, May 26, 2020

Tips on staying hydrated / How to know when you are thirsty


Drinking More Water During Hot Weather

When you spend time outside in hot weather you probably start to feel thirsty in a fairly short time. That's a normal response and one you should pay close attention to—it means your body needs more water to deal with the heat. Learn why this happens, the symptoms of dehydration, and how to ensure you are drinking enough water when the temperatures rise.
Your Body Needs Water to Deal with Heat
Your body functions best within a certain temperature range, and when you get too warm, it needs to cool off. There are a couple of ways your body accomplishes this cool-down. First, your blood vessels dilate to increase blood flow to the skin. This allows excess heat to radiate away from your body. Then, you also start to sweat. Evaporation of the sweat cools the skin, which in turn helps to cool the whole body. The problem is that excessive sweating can lead to dehydration.
You sweat more when the temperature's hot, especially if you're working or exercising in the heat. Drinking water helps replenish the fluids lost by excessive sweating. If you don't get enough water, you may become dehydrated, and the combination of hot temperatures and dehydration can lead to serious heat-related illnesses.
Signs You Need More Water
For most people, thirst is a very good indication that you need more water. Even before you become dehydrated, you'll feel thirsty, and your mouth may feel dry or sticky.
After a while, you may also become lethargic and fuzzy-headed. Other signs include reduced urine output (and the urine is dark yellow). You might even notice your eyes look a bit sunken and feel dry.
Even a little dehydration can be a problem, so don't ignore those early signs. Even mild dehydration reduces your ability to think clearly and your physical coordination.


Tips for Hydrating in Hot Weather
·         Start hydrating right away.
It's easier to maintain your fluid balance if you start out in a well-hydrated state.
  • Schedule regular beverage breaks and keep a water bottle handy so you can take frequent sips of water while you work or exercise.
  • Choose electrolyte-replacing drinks for maximum water absorption when you are exercising for more than an hour or when you are sweating excessively during exercise in hot weather.
  • Drink water after you've finished work or an exercise session.
  • Snack on fresh fruits that are rich in water, like berries, watermelon, peaches, and nectarines.
How can I tell when I'm dehydrated?
·         One of the easiest ways to tell whether you are adequately hydrated is by checking the color of your urine. In general, light colored urine is an indication of adequate hydration. If you are experiencing infrequent urination and the color of the urine is dark yellow, these are signs of dehydration.
·         Other signs of dehydration are: thirst, headache, constipation, fatigue, weakness, dizziness, irritability, cramps, depression, weight, gain, water retention, skin blemishes, vomiting or nausea, and bladder infections.


Thursday, May 21, 2020

Russell Relaxation Workout

Click on the link below to access your workout video Google Slide:


Things to do today:
1) Perform the FULL workout.
2) Submit the video into google classroom.


Saturday, May 2, 2020

What is a Burpee, it's Possible Benefits and How to Perform One

What is A Burpee

Burpees are a compound movement requiring muscular strength and endurance, coordination, power, and cardiovascular fitness simultaneously.

An example of a Burpee in Slow Motion:


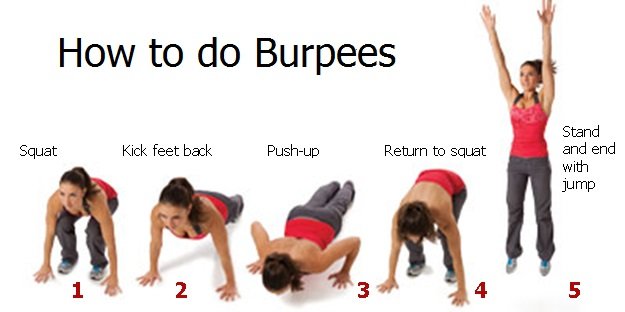
Below is a "How to" Burpees for Beginners Video 
(click on video to play)


burpee
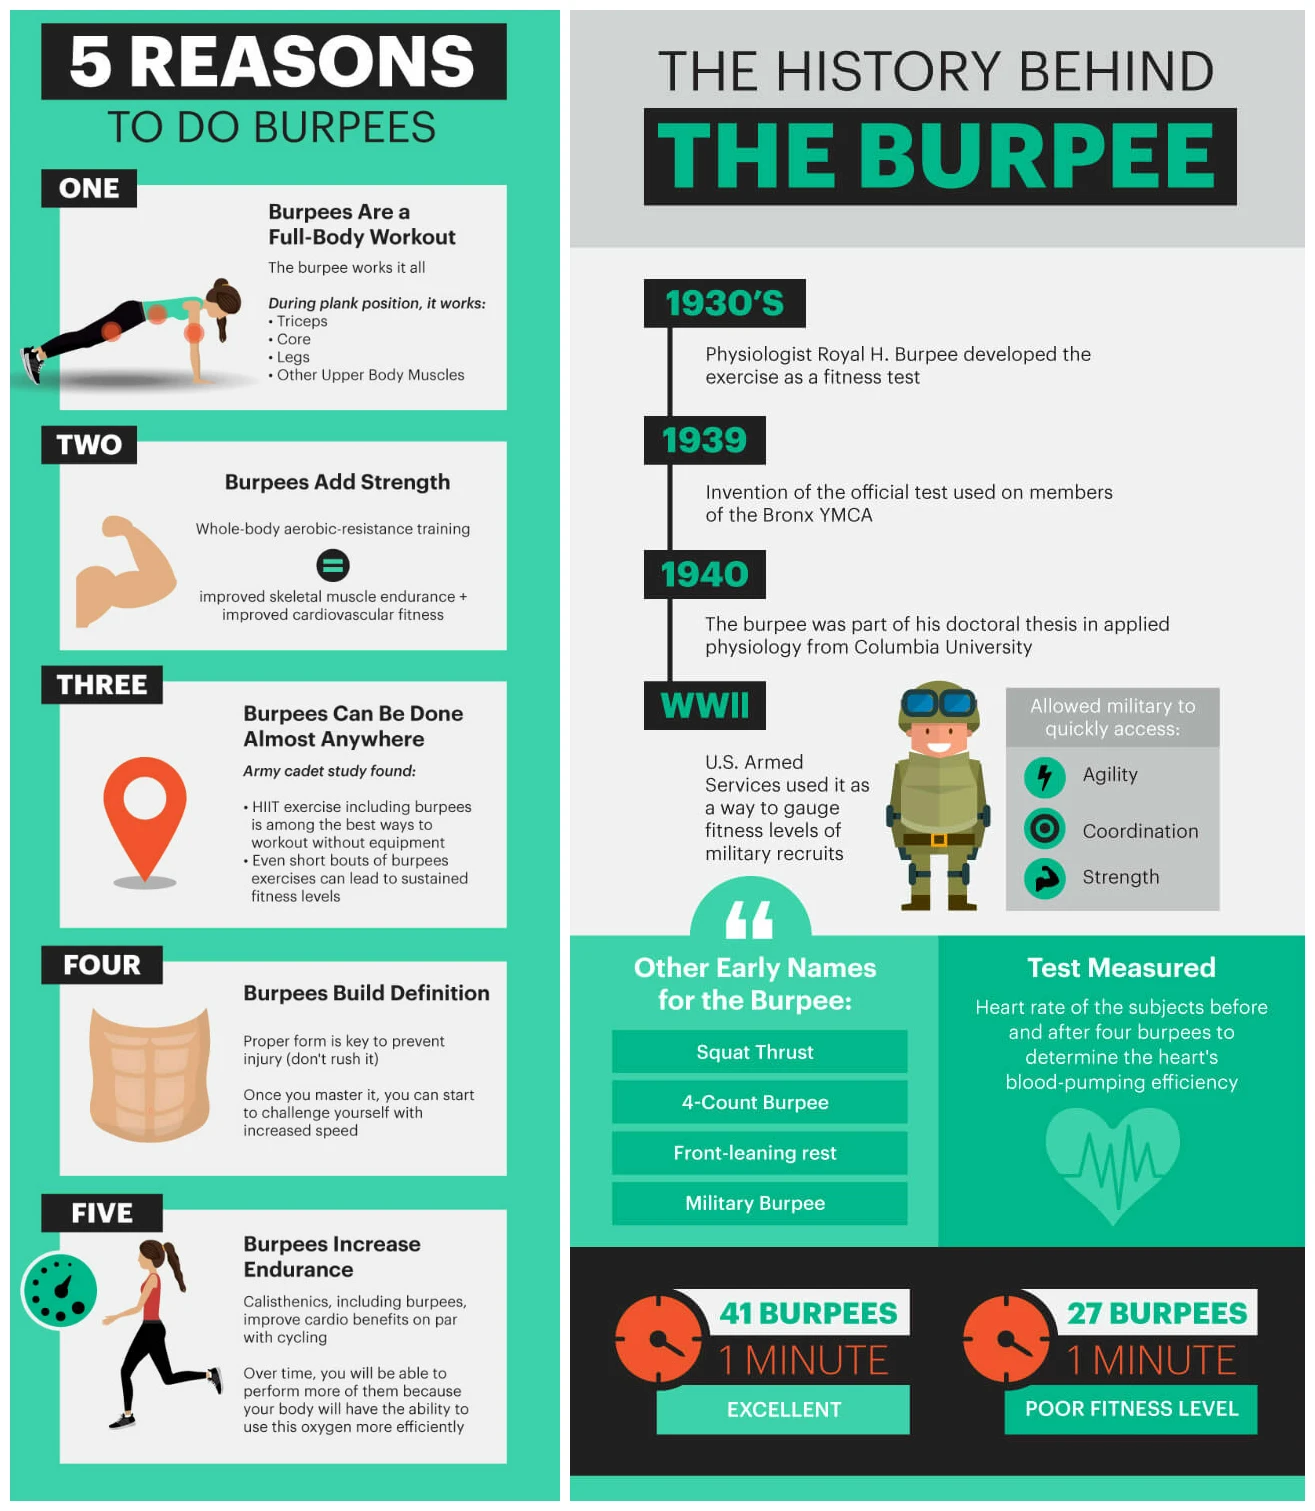
Burpee: Variations, Benefits and Reasons To Do It

5 reasons to Do Burpees Everyday – WWW.JCMUSCLEBUILDING.COM

Sunday, March 22, 2020

How to Perform The Basic Plank

According to Wikipedia.org, the Plank (also called front hold, hover, or abdominal bridge) is an isometric core strength exercise that involves maintaining a position similar to a push up for the maximum possible time.

The Guiness World Records lists the record for longest duration of a front plank, resting on elbows, as 8 hours, 15 minutes and 15 seconds, set by veteran Marine officer George Hood on February 20, 2020.


Thursday, March 19, 2020

How to insert a picture or clip art into an excel file (similar to google sheets)

Here is a work around if you do not already know how to insert a picture or clip art into an excel file, which by the way is similar to the Google Sheets File that I sent earlier today via google classroom.

Hopefully this works for you. 
If you have come up with some other way to show evidence of your work, please email me so that I may see if that is a viable option.


Monday, March 16, 2020

Saturday, March 14, 2020

Morning Stretch Workout

The Morning Stretch Workout is one of those "quick" little routines that you can do first thing in the morning that can help you become unstoppable and stay that way...Enjoy!

FOCUS: Full Body

DIFFICULTY: Perfect for beginners


Top to Bottom Stretching / Cool Down

Just because we will be out of school for the next several weeks, it doesn't mean that our ability to stay active and fit stops.  Opportunities to move and stay active are endless even while at home. 
Here are some simple after workout stretches that you can try out to help you avoid muscle cramping and stiffness.


Wednesday, March 11, 2020

What is the Fitnessgram Push Up Test and how to get better at it.

The Push Up Test measures upper body endurance, as opposed to a one rep maximum bench press test which measures muscular strength.

The objective is to complete as many 90 degree push-ups as possible at a rhythmic pace.

  • Students begin in the up position and follow the cadence while they complete the push-ups. 
  • With a straight back, students must go down low enough so there is a minimum 90 degree bend in their elbows. 
  • Return to the up position in pace with the cadence and with arms fully extended. 
  • Form errors include: not going low enough, stopping or not maintaining the proper pace, not maintaining the correct straight back body position, not extending arms fully enough and touching with the body on the way down. 
  • After the first form error students get the opportunity to make the correction. 
  • After the second form error the test is concluded.


Monday, February 24, 2020

Sample PACER Individual Score Sheet


Below is a SAMPLE of your individual score sheet for the Fitnessgram Pacer Run.  Please read the directions below to familiarize yourself with how to fill out the form.


Here is the Link to the 


Sunday, February 9, 2020

Helpful Illustrations/Diagrams to Common Volleyball Skills


Below you will find some illustrations/diagrams to common volleyball skills by progression, courtesy of USA Volleyball.


SERVING
Sooner or later, every player ends up in the right back position and gets to put the ball in play. 
Your serving options are:

Overhand Serve
This is the most popular serve in competitive volleyball. There are many variations that you can master with practice. As in any serve, make sure you don’t touch or cross the end line at any time during your serve. This type of serve offers speed and deception.
When using the overhead serve, the ball passes over the net quickly and can be made to do a number of different things including dropping quickly and floating erratically. Strike the ball with either an open hand or a slightly cupped hand. A rigid wrist will allow you greatest power. Toss the ball over your head about three feet and slightly to your left and take a step forward with your weight shifting from your right foot to your left foot. Arch your back slightly and bend your arm at the elbow as the right arm comes behind your head and is brought forward to strike the ball. Finish with a follow through to your hip. Once you know what open spot on the other side you will serve, focus on the ball, from toss to contact.

OVERHAND SERVE BALL ACTION
The floater
This ball flight has no stabilizing spin and will dart more like a knuckle ball in baseball. The secret is to simply hit the ball in the center - in relation to its line of flight - so very little or no spin occurs. Floaters work equally well with the underhand serve or the overhand. The movement of the ball is very unpredictable to the opposing players.
The top spin
This ball flight results when the ball is struck on top using wrist snap and moves very quickly over the net. The beauty of this shot is that it drops suddenly, leaving little time for an opponent to react.
The jump serve 
This ball flight requires a higher toss and a literal jump in the air. Apply contact with the ball just as in the Top Spin serve, and the results can be even more devastating given the added force of the jump. However, this is the hardest serve to master, and without sufficient top spin, the ball will likely end up way out of bounds. It’s safest to aim this serve at the middle of the court.
The curve
This ball flight can be most effective outdoors in windy conditions. Approach the shot just like a top spin serve until the moment of impact and then hit the ball left or right of center. The ball will curve in the direction in which it is hit.


Underhand Serve
Since this is the easiest serve to execute, don’t be embarrassed to use it in novice or recreational situations. The goal of any serve is to get the ball in play. Sure, we all like to hit an “ace” that rockets across the net, but the first obligation is to maintain serve. The technique is to gently toss the ball up and in front of yourself while bringing the other hand forward to make contact. A simple toss of several inches will suffice. Make contact with the heel of the hand or the open part of the palm along the index finger and the thumb. If you prefer to fold you fingers into your palm for strength or control, keep your thumb out to the side and avoid striking the ball with your knuckles. Such an irregular surface can make the ball go in unpredictable directions. Stand outside the court, anywhere along and behind the end line, about ten feet from the right sideline. If you’re right-handed, hold the ball in you left hand and take a step forward with your left foot while lobbing the ball ever so slightly in front of yourself. All this time you bring your right arm back past your hip and then forward to meet the ball just as it is coming down from the low toss. Never take your eyes off the ball. Just before you start your serve make a mental picture of the opponent’s positions on the court and decide where you’re going to attempt to put the ball.


Forearm Pass

PASSING
In volleyball much is made of the ability to serve because of the personal fitness and deception that can be demonstrated; to set, which is volleyball’s answer to the quarterback position of football; to finish a rally with the placement and power of a spike.
Perhaps the least recognized and most critical element of volleyball is the pass. In recreational volleyball it is the greatest moment of confusion because some players are concerned about returning the ball while others are just plain uncertain where that ball is going to go after the first touch.
More points are lost on a team’s inability to deal effectively with the first ball over the net than at any other point in a game. Most experienced players value a teammate who can pass, as much as they do a good outside hitter and setter. The reason is simple. A good pass will transform your team from a defensive posture to an offensive attack. The most common and effective form of passing is the forearm pass. It’s the easiest way to get the ball under control. The only way you can be called for a foul is if the ball rolls up your arms or comes to rest on you arms which will result in a held ball call.
The forearm pass is also known as the bump pass. To use it correctly, you must join your hands together and allow the ball to strike the fleshy part of your forearms simultaneously. There many ways of joining your hands, we’ll touch on a couple here. But the best way to learn yourself is to watch a few players and experiment. A common mistake is to allow the ball to strike your wrists or hands, often resulting in an unpredictable pass or a ball returned over the net, commonly called an overpass. The best way to avoid this problem is to remind yourself to bend your wrists and hands down before impact to help cushion the ball.

TWO HAND POSITIONS
Wrapped fist - Make a fist with your dominant hand and wrap it in the palm of your other hand, with both thumbs side by side and pointing at the floor.
Cupped palms - Bring your hands together as if you were going to take a sip of water from your hands, and lay your thumbs across the top as in Wrapped Fist position. Some players even like to lock their fingers under their thumbs. See Diagram Below.
Pick the passing method that works best for you. Don’t be concerned about which method is better than the other. It’s really about personal choice and effective control. Whichever you choose, keep these five points in mind:
1. Keep the ball between your wrists and elbows in the fattest part of the forearm
2. Press the wrists and hands down to hyperextend the arms
3. Lock your elbows. This gives the ball the most area to hit, and helps you control the direction of your pass.
4. Try to bend your knees before the ball gets to you so that you can both absorb the serve and re-direct the pass.
5. Don’t swing at the ball, but do try to shrug your shoulders toward your target at the moment of impact.


Setting

SETTING
The setter runs the offense, and determines which hitter to set. Sometimes, a team has two setters. The key to good setting is consistency. The basic premise of setting is to take a bump pass and convert it to a well placed ball that can be effectively hit by another player to the opponent’s court. The proper technique for setting is to raise your hands about five inches above your head with your thumbs on the bottom and pointed towards your eyes. Your fingers should be loose and slightly cupped. Don’t spread your hands any farther than necessary to receive the ball. As a guide, you’ll have a two to three inch gap between both of your thumbs and both of your forefingers.
Here are a few things to keep in mind about setting:
1. Get to the ball.
2. Face your target (except when you’re deliberately making a back set).
3. Bend your elbows and your knees.
4. Look at the ball through the opening between your hands.
5. Bring both hands into contact with the ball simultaneously.
6. Don’t let the ball touch your palm. This is called a push, and is a violation. If the ball comes to rest in you hand, or you strike the ball unevenly with either hand, you’ll be in violation.
7. Receive the ball over your head, and let it snap out of your finger pads. Keep your hands above your face or you’ll be whistled.

Six basic types of sets 
(The names of the sets may vary with different volleyball programs):
One Set - Set a foot or two over the net and hit while the ball is still rising. This is the quickest of sets and is usually for the middle hitter.
Two Set - Set two to four feet above the net and is also quick. Again, this ball is usually for the middle hitter.
Three Set - Also set low and fast (about 4-6 feet above the net and delivered midway between the setter and the sideline). This ball is for either the middle or outside hitter.
Four Set - A low set (1 - 2 feet above the net) for the outside hitter that is delivered near the sideline and over the net. Sometimes called a “Shoot Set.”
Five Set - A high Backset near the sideline.
Six Set - (fist hand signal) A high outside set to either sideline.
Finally, there is a time when the setter gets to try and score. This is called a “setter dump” and is executed when the setter comes to the net but instead of setting, pushes the ball over the net in a “tip” play.


INDIVIDUAL DEFENSE
There are only two ways to mount a successful defense in the game of volleyball; digging and blocking. Both require hard work. You must be willing to sacrifice physically.

Blocking

Blocking
The surest way to cripple your opponent’s attack is to take away a hitter’s spike. And the surest way to do that is with a well coordinated blocking scheme. Blockers don’t need to take a running start, but must stay close to the net and leap up. If you require a running start to jump, you probably don’t belong in the block. Stand with your hands and fingers held fully extended above the shoulders. Focus on the hitter in front of you and slide into the path of the descending ball at the point where it will cross the net. 
Your jump should occur just slightly after the hitter’s. Knees must be bent before takeoff to jump straight up. As you jump, fully extend your arms and hands. Spread your fingers, but keep them rigid, and bend your wrists as you rise above the net so that your hands break the plane of the net. If you keep your arms just a few inches apart, you’ll avoid letting a ball go through them.
If you’re a shorter player forced to block, bend your wrists back instead of forward and don’t try to penetrate the net after the block which should put the ball in good position for either you or another teammate to play it. This is called a soft block. Blocks don’t count as hits so you can legally play them (except in beach doubles, where it does count as first touch). The double block usually relies on the middle hitter and one of the outside hitters to obstruct as much hitting space as possible. 
The outside hitter must establish the position of the block, and the middle hitter moves to the position and closes the block. The middle hitter gets close enough to insure that the ball cannot get between the blockers’ bodies or outstretched arms. If positioned correctly, the blockers prevent the cross-court shot and the line shot.
The triple block is used occasionally and requires all three front row players to participate. No back line players may come up to block.

Digging

Digging
The proper technique for a dig is similar to a bump pass, but your knees are bent much more and your weight is more forward to be able to extend yourself to the floor if necessary to retrieve the ball. Sprawling, rolling and diving are extremely important techniques used to dig a ball. Proper execution, leg placement, timing of floor contact, and returning to your feet are considerations. Watch others, ask for instruction and practice these skills often in non-game conditions to avoid injury to yourself or others.


Spiking

 Spike Approach 
HITTING
If there is a moment of truth in volleyball, it is the perfectly hit spike. The spike combines power, speed and athleticism to provide the excitement that is uniquely volleyball. The spike is used to either put the ball down in a portion of the court where the opposition is not, or to strike the ball so hard that the defenders are unable to deal with it effectively. Front row players can attack the ball from anywhere on the court. Back row players can only attack from behind the three meter line.
Hitters must master such techniques as the:
Cross Court Shot - This ball must be hit extremely hard while aiming for a space on the floor between the front row players and the back row player that is diagonally positioned farthest from the hitter.
Tip or Dink Shot - The most important aspect of this shot is hitting with a wrist that does not break. Just push or roll the ball with the fingertips over the outstretched hands of the blocker(s). Be sure to face the direction of the dink or a push or carry may be called.
Line Shot - The simplest way to describe this shot is to imagine a left outside hitter who is right-handed receiving a set from her right side, rotating her body as she drops her left shoulder, and aiming the ball for the left sideline.
Soft Top Spin Shot - Commonly called a “roll shot” or off-speed attack, this ball is contacted a little softer and on the lower portion of the ball. The players hand then rolls over the top of the ball. This action creates top spin which causes the ball to drop quickly, usually just behind the front line players.
Hitting combines various elements of technique. Your approach to the net, speed, planting of feet, jumping, timing, body position, and distance from the net are among the factors that contribute to the success of your hit. If you’re experiencing difficulty in any aspect of your hit, or repeatedly making an error, ask a qualified instructor to study your form and make suggestions.


"Block you very much"


5 main skills in volleyball, courtesy of Volleyball Australia